Queries offer you a way to personalize an incident search or report to show only the information you need. You are able to choose the criteria of the search as well as the output information that you want to receive.
Watch the Video Tutorial:

Creating a Query
- Click the Add link in the Actions menu and select Queries.
- Enter a Query Name and then you can select the information for the Where Clause.
- From the list of Available Columns, choose the criteria for your report. For example, to see all incidents in a particular status, you would select [Status]. If you want to see incidents assigned to a particular user, you would select [Assigned To].
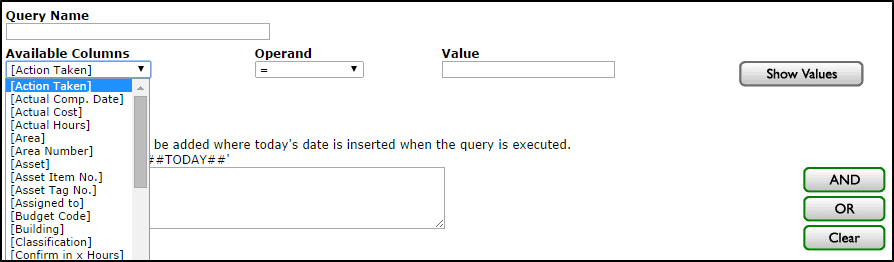
- Choose the Operand from the drop down list. (Example: =, <=, LIKE)
- Select your Value(s). You can either type the value into the field or you can click on the Show Values button to choose from a list. *Note: To select multiple values from the list, hold down the CTRL key as you make your selections.
- Click the Insert button to move your selections into the Where Clause field.

- If you want to add more information to the where clause, click AND or OR and repeat the steps.
- Next you will need to select your Output Fields. Put a check in the Show? check box next to each field you would like included in your report. You must select the Order (column) and Row where that information will go in your report. Click on the drop down boxes for Order and Row to select the position for that field. You can have up to 48 columns and 3 rows in your report.
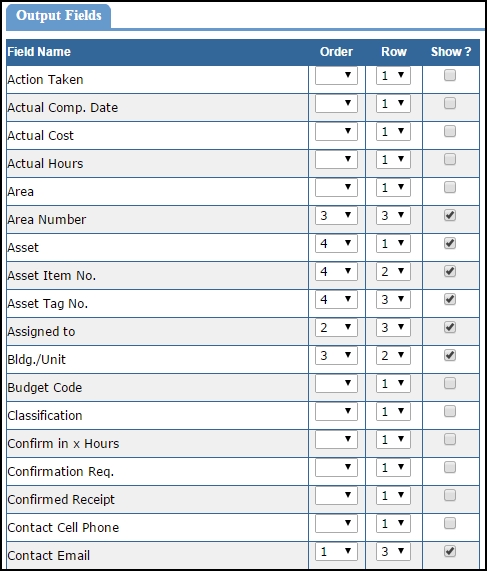

Example: In the above picture, Incident ID is in the first column of the first row. You would select "1" for the Order and "1" for the Row. Problem Type is in the second column of the first row. You would select "2" for the Order and "1" for the Row.
- When you have selected all of the Output fields, scroll down to the bottom of the screen and click Run Query. This will save your query and also run the report. Clicking the Save Query button will only save the query. You will then be able to print the query results to a pdf document or Excel spreadsheet.
Running a Saved Query
There are a couple of ways to run a query that has already been saved.
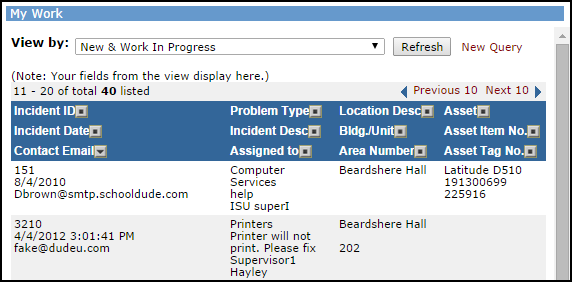
- From your home page, scroll to the My Work section. In the View by drop down box, select the query you want to run and click Refresh. That data will then appear in the My Work section. There is also a link here where you can create a new query.
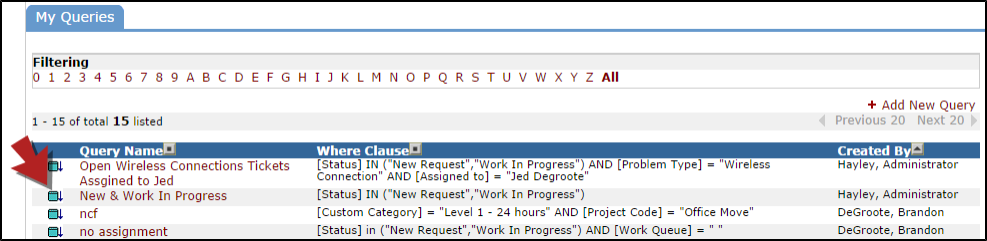
- You can also click on the Queries link under the Information & Analysis section of the home page. This will bring you to a list of all the saved queries in your account along with the where clauses for them. To run the query, click on the icon to the left of the Query Name. If you need to modify the where clause or output fields before running the report, click on the Query Name.
Query Permissions
You can also allow specific users and/or user roles to run the queries that you create by using Query Permissions. These queries will also appear in the My Work section of their home page.
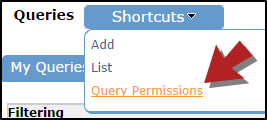
- Click on the Queries link under the Information & Analysis section of your home page. Hover over the Query Shortcuts and click the Query Permissions link.
- Select the query you want from the Query Name drop down box. Then you will be able to choose the users that will be able to run this query using the drop down boxes in the Add section.
- From the User drop down, select Any User to make this query available to all users (except Requesters and Site Administrators). You can also select specific users from the list.
- From the Role drop down, select Any Role to make this query available to all user roles (except Requesters and Site Administrators). You can also make the query available to only certain roles.
- Put a check mark in the Active box and click the Add New button.
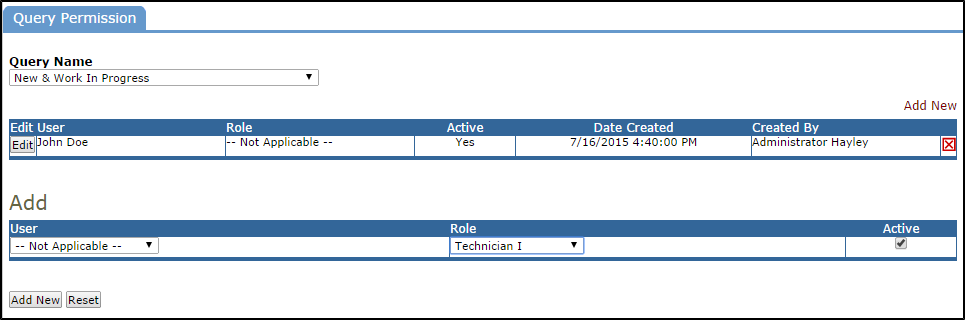
- You can add multiple permissions to your query. If you need to edit the permissions, you can click on the Edit button in the first column. If you need to delete the permission, you can click on the red x (
 ) in the last column.
